The ability to record and share moments from our computer screens has become crucial in the fast-paced digital age. Understanding how to take screenshot on mac is useful, whether you want to save a crucial document, show off your high score in a game, or capture a hilarious meme. We’ll take you step-by-step through all of the available techniques in this guide so you can quickly and easily record and share your screen.
Method 1: The Classic Command + Shift + 3( How to take screenshot on mac)
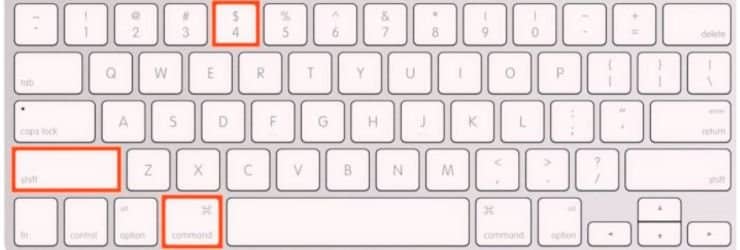
On a Mac, using a keyboard shortcut is the fastest and most straightforward way to take a screenshot. Just hit the same keys together: Command + Shift + 3. The screen will be captured in full, and a file will be saved to your desktop to represent the screenshot. When you want to record everything on your display at once, this is the ideal tool.
Method 2: Selective Screenshots with Command + Shift + 4(How to take screenshot on mac)
You can use Command + Shift + 4 to have more control over what you capture. By using this shortcut, you can choose the precise region of the screen you wish to capture by making your cursor into a crosshair. To capture a screenshot, click and drag the desired region, then let go of the mouse button. Once more, your desktop will be saved with the image.
Method 3: Capture Specific Windows with Command + Shift + 4, then Spacebar

To take a screenshot of a particular window, press Command + Shift + 4 and then Spacebar. You can click on the window you wish to capture by using this combination, which changes your cursor into a camera icon. After that, a screenshot of the window you selected will be saved to your desktop.
Method 4: Utilize the Grab Application
An additional tool that provides more screenshot options is the built-in Grab application, for those who prefer a more visual approach. Look for it in the “Applications” directory’s “Utilities” folder. Grab should be opened. From the “Capture” menu, select “Selection,” “Window,” or “Screen.” You can make changes to an image after it has been taken and saved.
Method 5: Capture Touch Bar Screenshots(How to take screenshot on mac)
If you have a MacBook Pro with a Touch Bar, taking screenshots of the Touch Bar is possible. Use Command + Shift + 6 to capture the Touch Bar’s content, and the screenshot will be saved to your desktop.
Conclusion:
You can now quickly and easily capture and share significant information, humorous moments, or anything else that catches your attention using your Mac’s screenshot feature. You’ll become an expert screenshot taker quickly with these easy-to-use techniques for taking, saving, and sharing screen shots. Cheers to your successful capture!


